This medium sized drinking horn is a unique tribute to the immortal old norse customs of celebration.
The self-designed ornamental patterns on this individual item are inspired by different norse styles of art commonly associated with the viking age. For the decoration two different techniques were used: Carving and Pyrography - the deep bas-relief carving and the warm brown tones of the burned parts give an exquisite contrast and depth. The runic inscriptions dedicate this horn to Odin and vow the drink taken from this ritual vessel.
length: 535 mm / 21,1 inches possible filling quantity: 1 Litre
Finally I made it. It was in July 2010 I presented this carved Knife here on my blog and since then I was planing to make a fitting sheath. Well, now it is done and I think it's good.
The Knife itself consists of a Mora-blade and carved reindeer antler.
The sheath is made of solid 4mm veg. tanned leather, hand tool, dyed and sewn.
This drinking horn was a custom work I dealt with during the last weeks - I think this turned out to become my best hornwork so far... The designing process was great - it was done freehand onto the horn, just the way I like it most - first with a lead pencil and after some small changes and the final approval of the customer with a permanent marker. Last but not least the bas-relief carving followed.
This job was close to driving me crazy. It was not the first time I carved horns but the first time the horns were for the customers' wedding - so I was constantly aware of the high relevance this work would have for the couple and their pagan marriage ceremony... Furthermore I had to do a pair - a pair that should be almost identical, apart from the fact that they are mirrored. And doing two identical horns means a total different strategy - so it took me almost two days of work to trace the design onto the horns. Usually, or at least very often, I design the patterns freehand on the horn - something that was completely out of question this time... So before I even could think about tracing any patterns, I needed to have the patterns first. Fortunately the classic celtic knotwork bands and the central Lugh's knot pattern were given so I "just" needed some knotwork band for the intermediate parts. And, call it a creative logjam or whatever, it took me ages to come up with this one: This was a real bastard to carve, but in the end it turned out well and the couple was really satisfied and happy with the result. And this is what makes me happy, too!
Another one of those things I ever wanted to do is to combine my two favourite crafts - carving and knife-making. I mean, is there anything that screams as loud for a carved decoration like a knife handle made from antler? I think not. So I took this knife which I actually made a few years ago but never finished. It served me in it's unfinished state sometimes as a working knife, sometimes it was completely forgotten. I just found it again a while ago and after all the progression of my carving abilities in recent times, I decided to finally dare it. There was this little wrist cuff lying around and I thought, "Hey, this pattern would be great for this handle!" and after 5 minutes of freehand transfering and some further hours of work the result was convincing. This is the first one in a long row of knifes with carved handles - you can be pretty sure about that! Since I do not know when I'll be able to make a fitting sheath, this piece is not for sale yet. However if you are interested in a "pre-order" don't hesitate to contact me!
After many many requests about how I carve the bone jewelry, I decided to show the process of making a Thor's Hammer here step by step. Keep in mind that this is NOT a real tutorial, since these steps display my personal way to reach my aim and may be totally improper for others. Though I am of course happy if you find it helpful for your own work.
Let's start! Of course there are some things needed before the actual carving work starts. First of all there was the design which you can see above. And a pile of "material" which you can see below.
on this picture you see my staff considering the most suitable piece for my work
I often get questions about the bones I use. Usually I simply buy bovine bones in the supermarket, frozen and filled with marrow. This is when my little helpers (see pic above) come into the play. During weeks of intense engagement they clean them very well and make them almost ready for the use. However, the sun and the weather are additional factors in the preparation process of the material.
The last step of preparation would be to choose a suitable piece of bone and to roughly cut it out.
Below you can see numbered pictures of the following working steps including the actually used attachments/accessories for my Dremel Power Tool. (click on them to make em bigger, you know?!) The numbers correspond with the steps of work. If there's no number on the single pictures, it means that they show the result of the previous procedure. Underneath you will find a short description of each particular step.
1. Transfering of the design onto the roughly cutted and grinded bone 2. Engraving the outlines with a medium sized, round-headed, engraving cutter 3. Cutting out the workpiece and beveling of some of the hard edges, using an engraving cutter with a cylindric head for both procedures
4. Using a big sized, round-headed, engraving cutter to deepen the section around the bottom knotwork 5. Using a small sized, round-headed, engraving cutter to deepen all important lines 6. Adjusting irregularities of the surface and the thickness of the workpiece
7. Using a small sized, round-headed, engraving cutter to deepen all important lines that may have vanished during the previous working step 8. Shaping of all edges with an engraving cutter with a cylindric head 9. Engraving the cuts on the lateral sections with a conic headed cutter 10. Using big sized, round-headed, engraving cutter to make the dots in the background of the bottom section 11. Using a small sized, round-headed, engraving cutter to deepen all important lines, add some new ones and "dotting" the lateral areas
12. Using different Diamond Wheel Point accessories for grinding down and smoothing
13. The final sanding with good old school sandpaper 14. Polishing
Due to the weather conditions I did no new carvings this year - until this week. I have some custom carving works to do, however I started with this two bone pendants for my shop to get used to the tools again after this seasonal break of more than half a year.
Thor's Hammer pendant with knotwork design Vårby Beast pendant
Here's the latest Drinking Horn I carved. This time I used my Dremel Tool only for the rough part and put much more effort into the refining work with my good old Mora Knives. The patterns I used are my own designs. I also made a holder for the customer which you can see below:
The Horn is 44 cm long and holds 0,5 l of fluid. It was sold for 340 $ (including the holder).
This medium sized drinking horn is a unique tribute to the immortal old norse customs of celebration. No matter if in the quiet family circle or with friends at some kind of pagan/medieval event - this horn will be an eyecatcher!
The self-designed ornamental main pattern on this individual item is inspired by the Oseberg-style, the Aegishjalmur symbol in the front grants power and strength to the drinking round.
length: 560 mm / 22 inches possible filling quantity: 1 Litre weight: 323 g
This piece was a commissioned work, look here for the original design: [link] I tried to be close to the original and to restrict my artistic freedom to the parts that left no other possibilities. It was really fun to do this piece though it was kinda tricky, too - just send me more challenges like that!
After the snow has melted away, many many forgotten cow bones occured - something that happens if you have dogs and a big garden... Instead of throwing them away, I started to create some nice new pieces of art: Some pendants made of cow bone - just now my favourite kind of work...
The first pendant is inspired by an old carving in Urnes style, but slightly changed. The second one is one of my own designs - a typical viking-style beast I used a few times on leather so far - this one actually gave me the idea to start again with a bit of bone-carving, simply because I wanted to see this pattern in another medium. This one is my own and won't be sold - sorry! The Mjölnir-pendant is also self designed - actually while doing it - but I am pretty satisfied with all 3...


 This medium sized drinking horn is a unique tribute to the immortal old norse customs of celebration.
 Finally I made it. It was in July 2010 I presented this carved Knife here on my blog and since then I was planing to make a fitting sheath. Well, now it is done and I think it's good.
 The Knife itself consists of a Mora-blade and carved reindeer antler.
 The sheath is made of solid 4mm veg. tanned leather, hand tool, dyed and sewn.

 So before I even could think about tracing any patterns, I needed to have the patterns first. Fortunately the classic celtic knotwork bands and the central Lugh's knot pattern were given so I "just" needed some knotwork band for the intermediate parts. And, call it a creative logjam or whatever, it took me ages to come up with this one:
 This was a real bastard to carve, but in the end it turned out well and the couple was really satisfied and happy with the result. And this is what makes me happy, too!
 Another one of those things I ever wanted to do is to combine my two favourite crafts - carving and knife-making. I mean, is there anything that screams as loud for a carved decoration like a knife handle made from antler? I think not.
 and after 5 minutes of freehand transfering and some further hours of work the result was convincing. This is the first one in a long row of knifes with carved handles - you can be pretty sure about that!
 After many many requests about how I carve the bone jewelry, I decided to show the process of making a Thor's Hammer here step by step. Keep in mind that this is NOT a real tutorial, since these steps display my personal way to reach my aim and may be totally improper for others.
 on this picture you see my staff considering the most suitable piece for my work
 1. Transfering of the design onto the roughly cutted and grinded bone
 4. Using a big sized, round-headed, engraving cutter to deepen the section around the bottom knotwork
 7. Using a small sized, round-headed, engraving cutter to deepen all important lines that may have vanished during the previous working step
 12. Using different Diamond Wheel Point accessories for grinding down and smoothing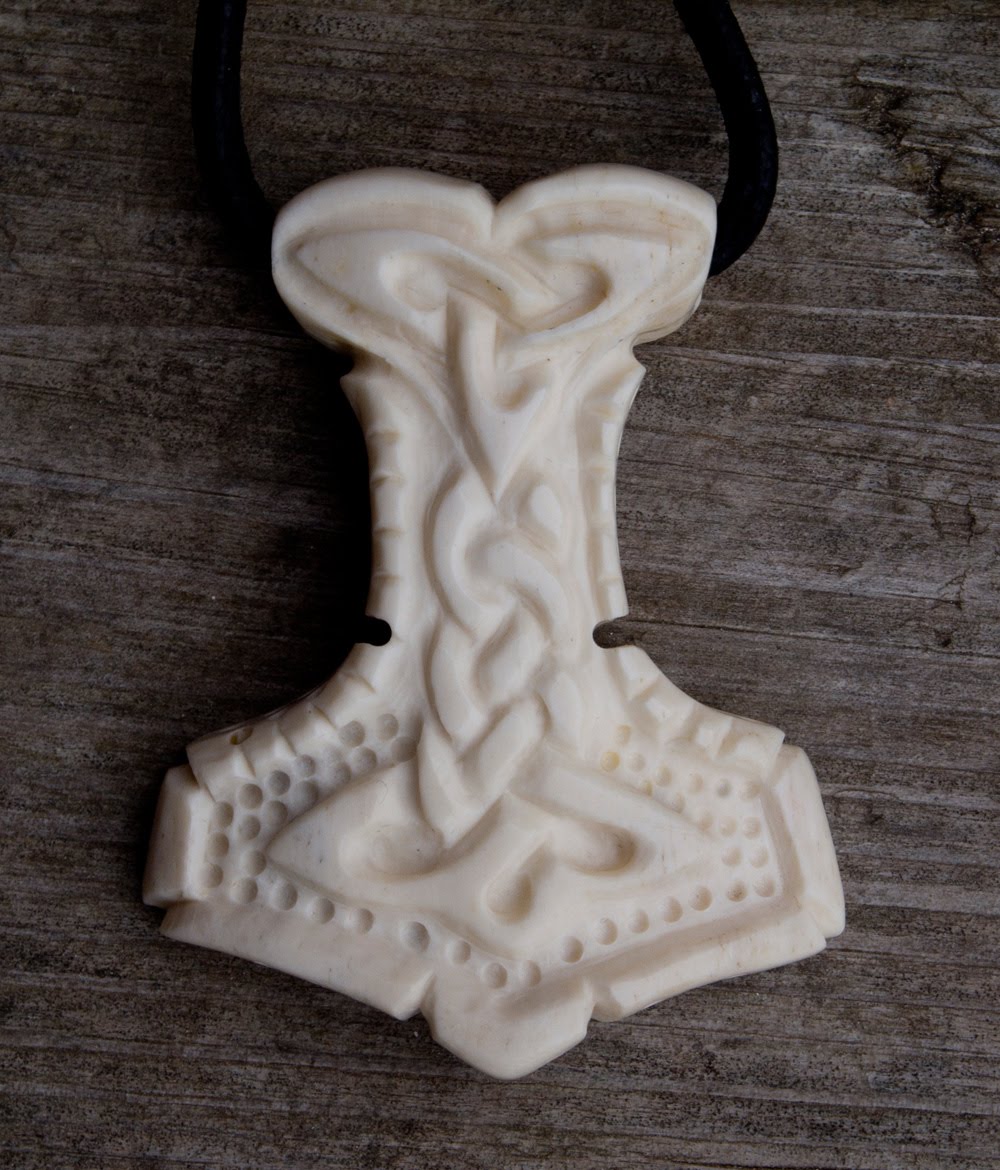

 Here's the latest Drinking Horn I carved. This time I used my Dremel Tool only for the rough part and put much more effort into the refining work with my good old Mora Knives.
 The Horn is 44 cm long and holds 0,5 l of fluid. It was sold for 340 $ (including the holder).


 New Jelling-Beast pendant
 New valknut pendant
 New Thorshammer design
 This piece was a commissioned work, look here for the original design: [link]
 Some pendants made of cow bone - just now my favourite kind of work...


